
Wiki & Guides
SCUM
Survival · Open World · Gamepires
Creating and Connecting to a SCUM Server
Step by step: order a SCUM server at RespawnHost, set the basics and connect — including the crucial port offset +2 for direct connect.
Last updated September 9, 2026 · RespawnHost
On this page
Creating a SCUM server at RespawnHost
This guide takes you from ordering to your first login on your own island. It takes under 5 minutes — the server itself is online in under 90 seconds. Since the 1.0 release (June 17, 2025) official dedicated server files exist; before that, SCUM hosting was only available through licensed providers.
Requirements
- A RespawnHost account — register here
- Balance on your account (prepaid system, top up e.g. via PayPal or credit card)
- SCUM on Steam (SCUM is a PC-only game)
Step 1: Start your order
- Open the SCUM order page (or go via respawnhost.com/en/scum-server-hosting and hit Create server).
- Log in if you haven’t already.
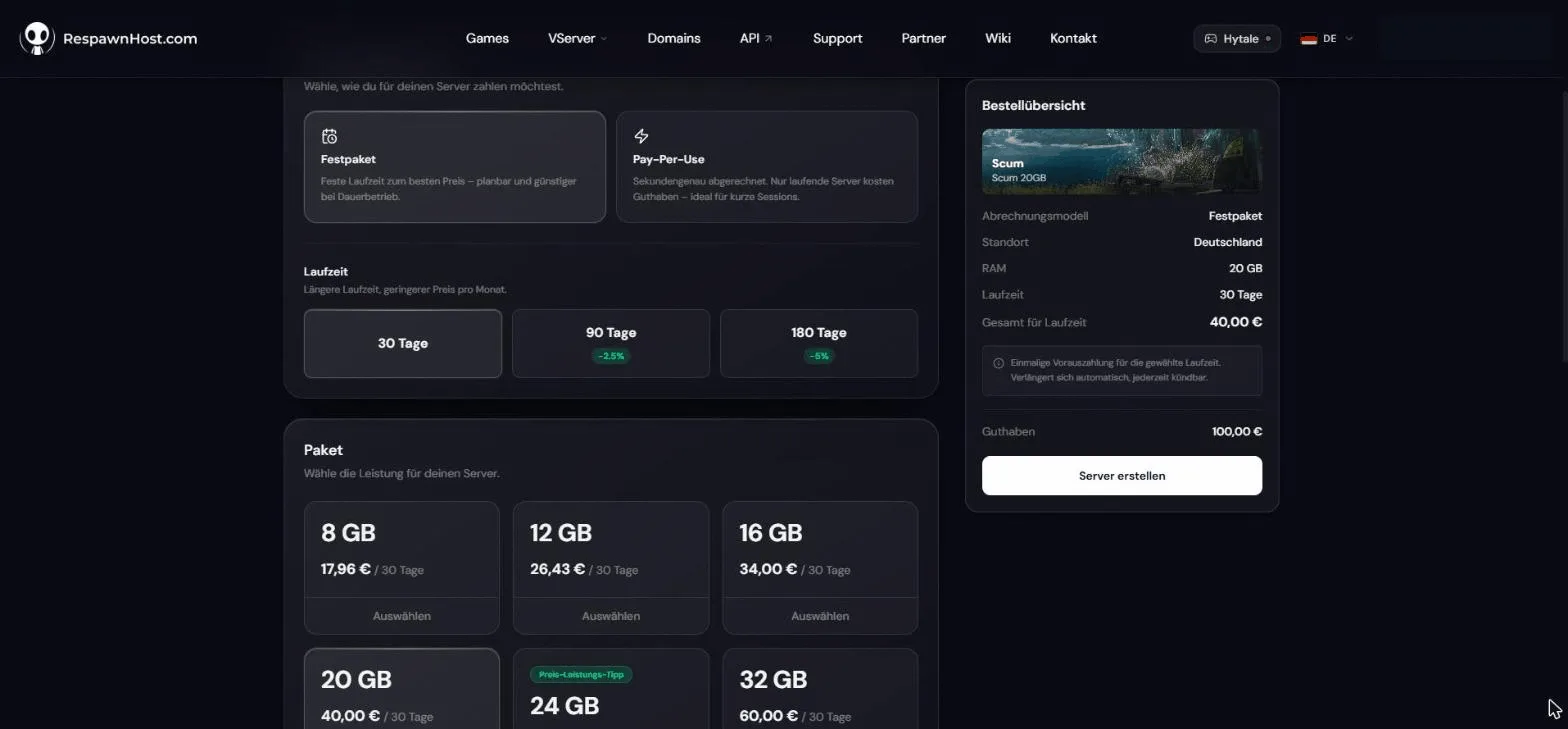
Step 2: Choose a billing model
RespawnHost offers two models — you pick during checkout:
| Model | How it works | Best for |
|---|---|---|
| Prepaid plan | Fixed price for a term (1, 3, 6 or 12 months — 1 month = 30 days), paid upfront from your balance. 3 months: −10%, 6 months: −15%, 12 months: −20%. | 24/7 operation, communities |
| Pay-Per-Use | Billed by the second — you only pay while the server is running. Server off = no costs. | Weekend squads, event servers |
Step 3: Choose package and location
- Package: Pick by group size — for a small squad the entry package (8 GB RAM) is enough; full 64-slot servers should go for 16 GB or more. See How much RAM & which package? for details.
- Location: Germany (Frankfurt) for Europe, USA (Salt Lake City and Charlotte) for North America or India (Noida) for India and South Asia. Pick whatever is closest to you and your players.
Complete the order — the server installs automatically and is ready in under 90 seconds.
Step 4: Set the basics
The core server settings live in the file ServerSettings.ini under SCUM/Saved/Config/WindowsServer/. You reach it via the panel’s file manager (or SFTP). The three most important values to start with:
| Setting | Meaning |
|---|---|
scum.ServerName | Name in the SCUM server browser. Pick something memorable and searchable. |
scum.ServerPassword | If set, only players with the password can join (empty = public). |
scum.MaxPlayers | Maximum number of players, default: 64. |
Note
Stop the server before editing ServerSettings.ini — changes only take effect on the next start.
All other gameplay rules (time of day, puppets, loot, fame …) are covered in Configuring your SCUM server.
Step 5: Start and connect
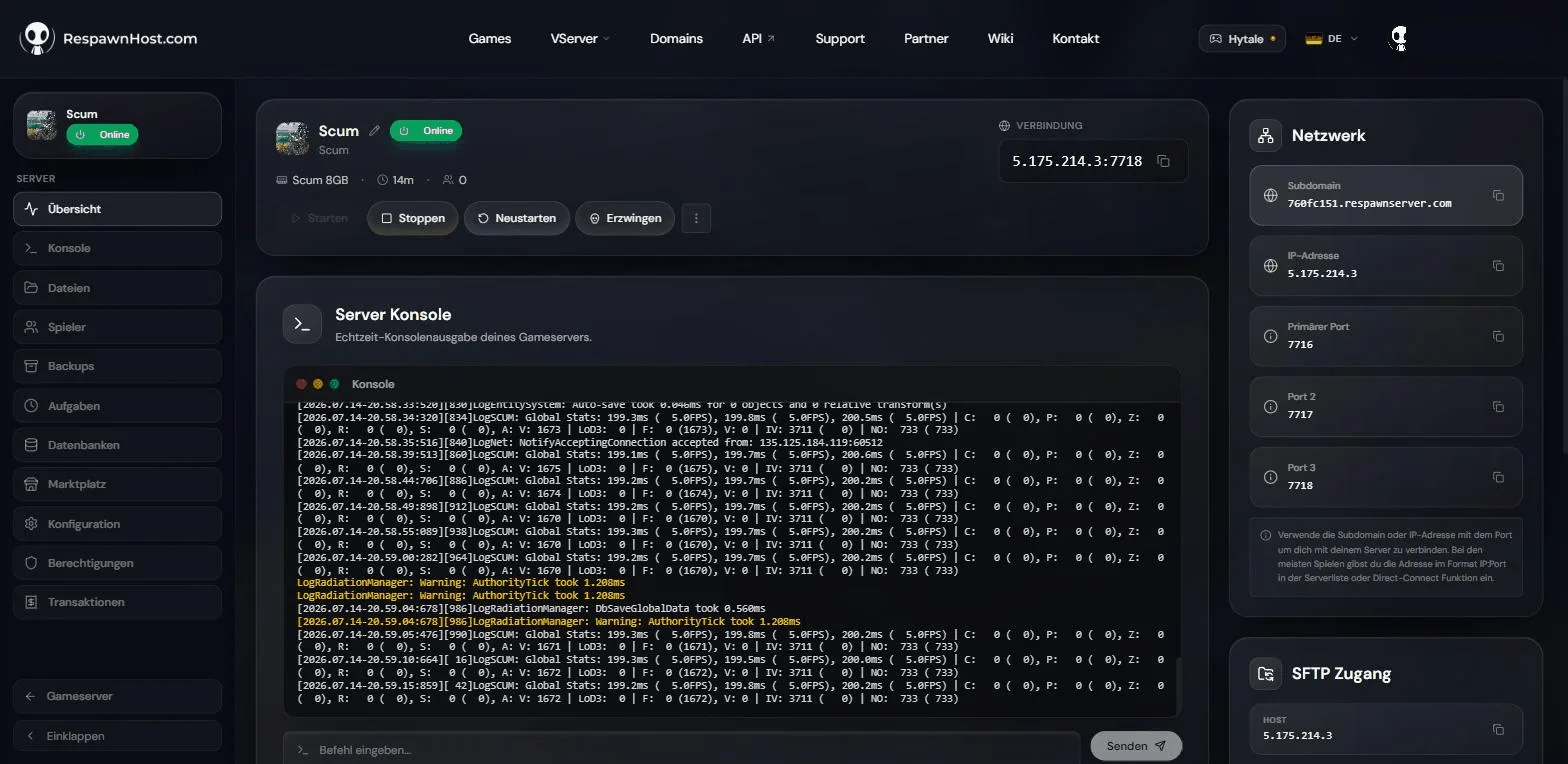
- Hit Start in the panel. After a short moment the status shows “Online”.
- Via the server browser: Launch SCUM → Multi Play → type your server name into the search → Connect. Freshly started servers can take a few minutes to appear in the list.
- Via direct connect: In the Multi Play menu you’ll find the Direct Connect field on the left. Just enter the address from the panel’s connection field (
IP:port) — at RespawnHost the correct port is already filled in, so there’s nothing to calculate.
Tip: the right port
Technically SCUM connects via the Steam query port, which sits 2 above the game port. At RespawnHost you don't have to work that out yourself: the connection field at the top of the server overview already shows the finished address with the correct port — just copy and paste it. (Some other providers only show the game port there, in which case you have to add +2 yourself.)
For reference, the three UDP ports a SCUM server uses:
| Port | Purpose |
|---|---|
| Game port (primary port) | Game traffic |
| Game port +1 (port 2) | Additional UDP socket used by the server |
| Game port +2 (port 3) | Steam query — the port SCUM connects through; shown in the connection field |
Becoming admin
Add your SteamID64 to the file AdminUsers.ini (same folder as ServerSettings.ini) — one ID per line, then restart the server. All commands are listed in SCUM admin commands.
Good to know
Note
New SCUM versions install automatically on the next server restart. The panel's file manager (or SFTP) gives you full access to all server files at any time.
Tip
Set up automatic backups in the panel — your entire save (world, bases, characters) lives in a single database file. More in Save game & backups.
Frequently asked questions
Is SCUM available on consoles, or does it have crossplay? No. SCUM is a Windows PC game on Steam — as of July 2026 there is no console version and therefore no crossplay.
Does SCUM support mods? No, there is no official mod or Steam Workshop support. Customization happens through the server configuration (settings, loot).
How many players fit on one server?
Up to 64 players by default (scum.MaxPlayers).
Next steps
- Configuring your SCUM server — time of day, puppets, fame & more
- How much RAM & which package? — recommendations by slots
- Whitelist, bans & private servers — securing your server
Your own SCUM server?
At 3 hours a day that is about €10.13 a month. Billed by the second: server off, costs off.
- No subscription, no minimum term
- Balance does not expire while your account exists
- Online in under 90 seconds